This tutorial is designed to introduce you to the new Pattern Drawing Tool and guide you through the basic steps to get started.
Its goal is not to explain every single feature, but to help you feel confident opening the tool, creating your first layout, and beginning to draw your own quilt patterns inside QuiltInk.
From there, you’ll learn by doing — and that’s where the real progress happens.
Some of you saw me refer to this tool as “Vector” before. Originally, I planned to call it that. But after someone kindly pointed out that it’s already the name of another software, I realized it wasn’t the right choice — so I decided to change it.
For now, we’re calling it Pattern Drawing Tool (provisional name).
I’ve shared the new name options in the latest newsletter, and you can now help choose the final name by voting in the survey below:
Now — let’s talk about what this tool actually is.
What Is the Pattern Drawing Tool?
The Pattern Drawing Tool is a vector-based quilt drawing program built directly inside QuiltInk.
Many quilt design programs are block-based systems. They are great for arranging blocks and building layouts. But they are usually focused on quilt construction logic first.
A pure vector program, on the other hand, gives you full drawing freedom — but it doesn’t understand quilts. It doesn’t snap pieces the way we need. It doesn’t think in units. It doesn’t help you build blocks easily.
The Pattern Drawing Tool combines both approaches. It gives you:
- The freedom of a vector drawing program
- Perfect snapping between pieces (essential for clean coloring pages)
- Quilt-aware structure
- Preset units and traditional blocks (more coming regularly)
- The ability to create your own blocks and pieces
- The option to build multiple layouts inside the same file and compare them in situ
This is not just about arranging blocks. It’s about being able to draw your own quilt patterns from scratch — or prepare existing ones — in a way that guarantees they will work beautifully inside QuiltInk.
With the new Pattern Drawing Tool you are able to:
- Draw your own quilt patterns
- Upload coloring pages from PDF patterns you’ve purchased
- Then color them using QuiltInk and your own fabric palettes
Getting Started
Below you’ll find the basic steps to start using the new Pattern Drawing Tool.
Don’t worry about learning everything at once.
Start simple, explore the tools, and allow yourself to experiment.
The goal is not to master it in one day — it’s to begin creating and see how powerful (and fun!) it can be.
Let’s get started.
1️⃣ Create a New Pattern
Go to your Profile page.
Open the Private Patterns section.
Create a new Private Pattern. Click "+" icon and add all the info required.
Open the new pattern.
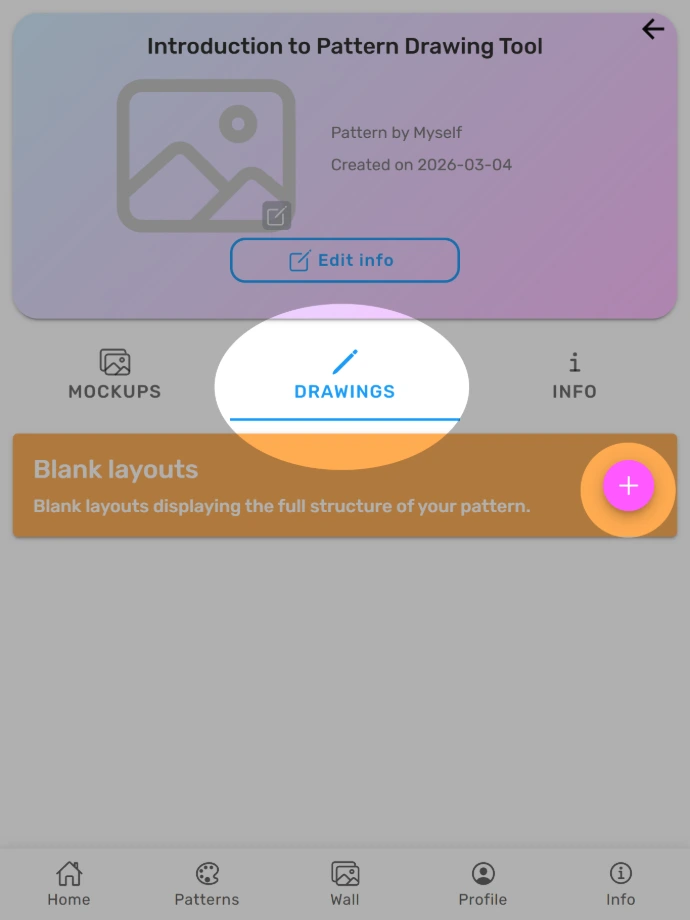
In the Drawings tab, click the “+” button to create a new layout.
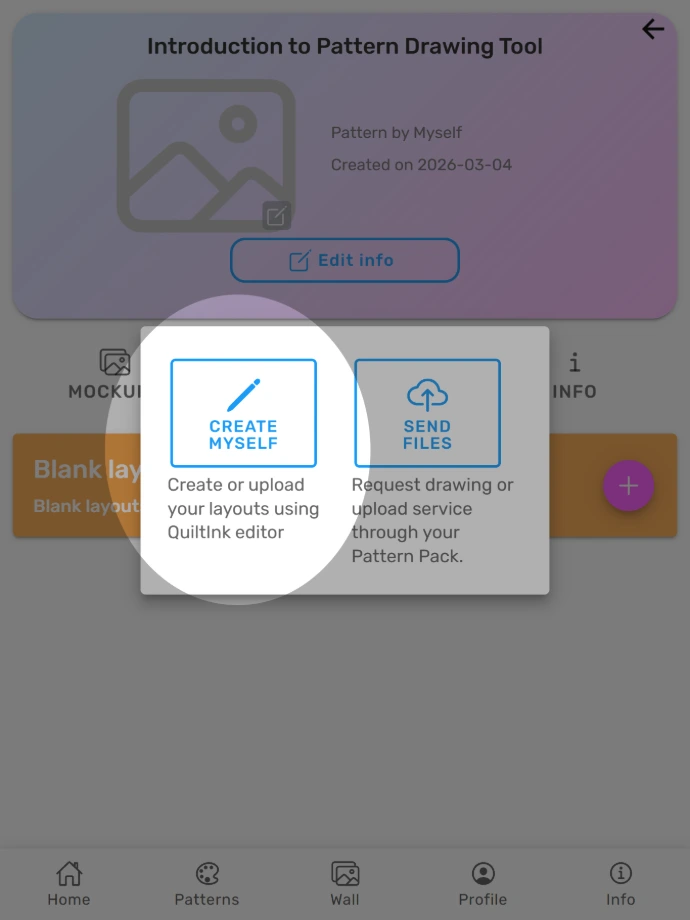
- A pop-up window will appear — choose “Create myself” to open the Pattern Drawing Tool and draw the layout on your own.
The other option allows you to request my help to set up the pattern for you using a Pattern Pack — for example, to digitize a paper pattern you already have, or if you would like me to prepare the pattern setup for you.
After selecting “Create myself”, a new window will open with the Pattern Drawing Tool.
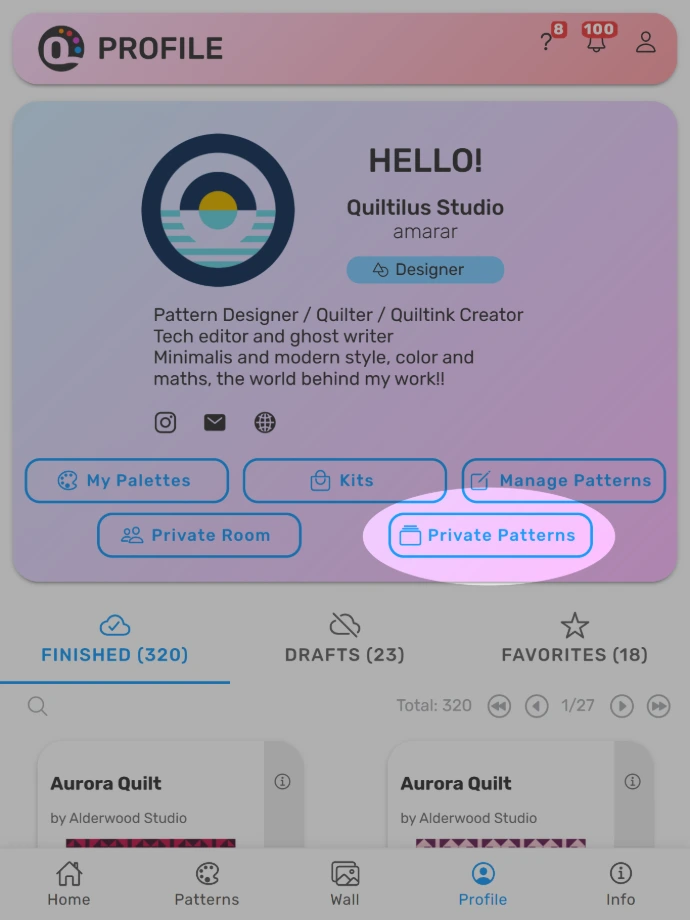
Click Private Pattern button at your profile page
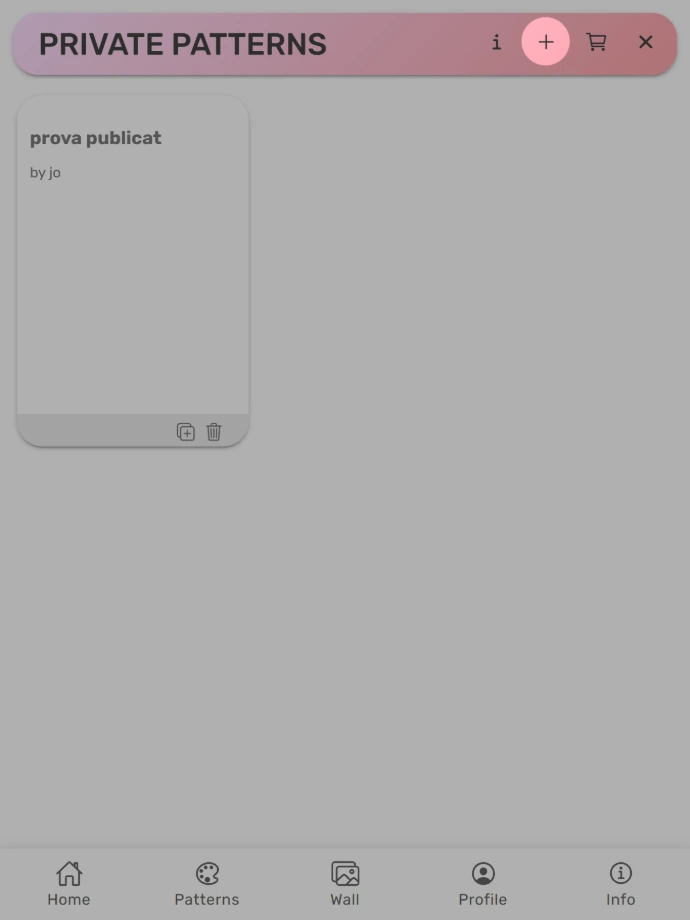
Click "+" to create a new Private Pattern
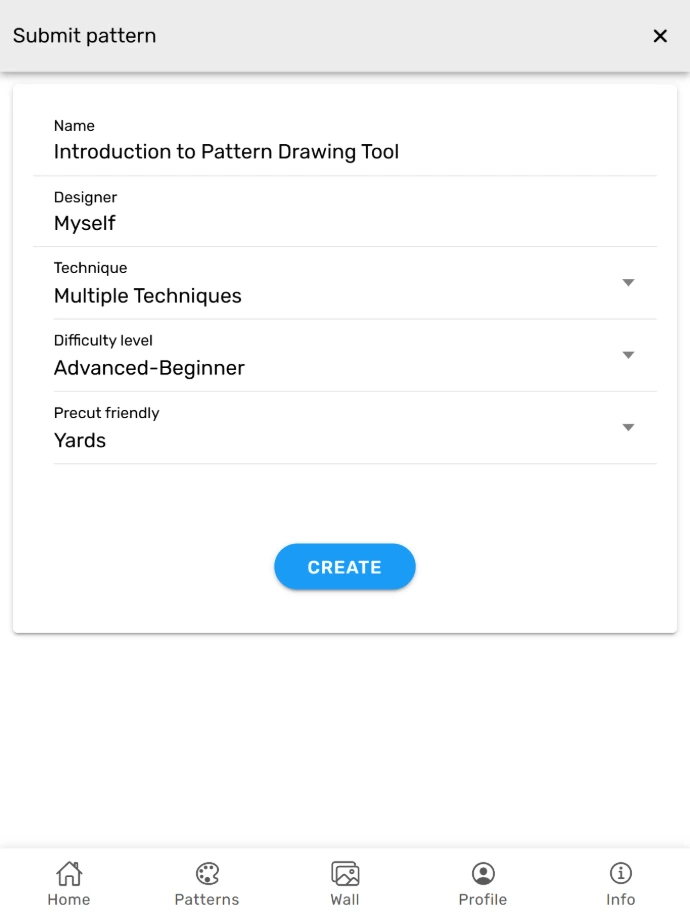
Fill the info
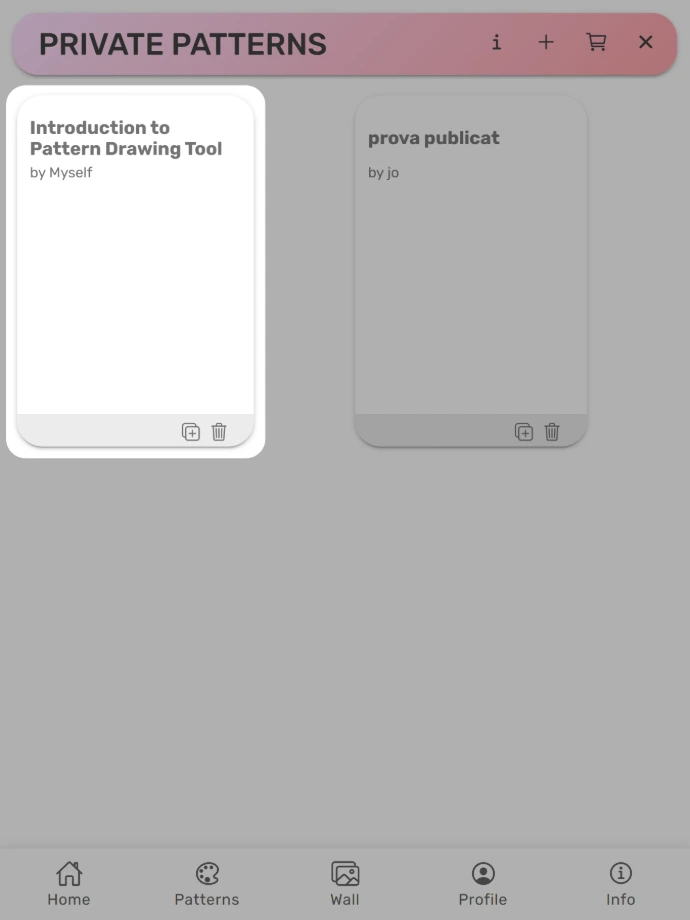
Click to access the new pattern
At the Drawing Tab click "+"
Click "+" to create a new Private Pattern
2️⃣ Draw and Build
Inside the Pattern Drawing Tool you can:
DRAW YOUR OWN DESIGN
- Use preset units and traditional blocks (more are being added regularly)
- Combine them to create your design
- Create your own blocks and pieces from scratch
- Duplicate, align, rotate and refine elements
- Create multiple layouts inside the same file to compare versions
The program guarantees precise snapping between pieces. This is extremely important to obtain clean coloring pages and accurate mock-ups.
Alongside quilt-specific tools, you’ll find familiar vector features such as duplication, alignment and rotation (row and column cloning is coming soon).
Take some time to explore the icons in the interface — experience is the best teacher. The more you use it, the more natural it will feel.
Our goal at QuiltInk is simple: powerful tools that are easy to use, with results that look professional.
✏️ Things to Keep in Mind While Drawing
Before you move forward with your design, here are a few important things to consider:
- Work with finished sizes.
When drawing your pieces, think in finished measurements.
Remember that when sewing, you’ll need to add the ¼” seam allowance around each piece. - Do not overlap pieces.
- Pieces should touch where needed, but they should not overlap. Overlapping shapes can create problems when generating coloring pages and mock-ups.
- Make sure pieces are perfectly aligned.
Clean alignment gives you a clear construction diagram and ensures your coloring pages work correctly for mock-ups. - You don’t need to merge outlines here.
- QuiltInk coloring pages allow you to remove outlines when coloring, so you don’t need to join pieces inside the Pattern Drawing Tool unless you specifically want to. (Some designers prefer to merge pieces for their own coloring pages, but it’s not required.)
Taking a few extra minutes to check these details will make everything smoother when you move to coloring and mock-ups.
IMPORT FROM AN SVG FILE
You can also import coloring pages from patterns you’ve purchased in PDF format that are not publicly available on QuiltInk. This allows you to color them using the QuiltInk coloring pages, all the public palettes, and your custom palettes.
To do this:
Extract the coloring page from the PDF.
Convert that page to SVG format. For that you can
Use an online PDF-to-SVG converter.
Or open the PDF in the free software Inkscape and save it as SVG.
You can download Inkscape here: https://inkscape.org
There is no need to modify the document — simply open the PDF remove all the pages you don't want, save it as SVG.
Once you have the SVG file:
On QuiltInk, create a new private pattern as we indicated above, and access the Pattern Drawing Tool.
In the Pattern Drawing Tool, click the first icon in the top toolbar to import your file.
Select the SVG file you want to upload.
Enter the real quilt size and adjust options if needed. (The size can be edited later if you need to remove text in the page for example)
After importing, you can edit or modify anything if needed — for example, if some pieces are not perfectly aligned.
✏️ Keep in mind:
- Not all PDF coloring pages are perfect graphics. And not all conversions generate clean vector files.
- Sometimes small adjustments are needed so the design colors correctly, for example: remove duplicated pieces, realign pieces for a perfect pieces alignment, ... I can show you more about it in further tutorials and meets.
- Sometimes the coloring page inside a PDF is not vector-based. If that happens, you won’t be able to import it into QuiltInk to color it directly — you will need to draw it! And honestly, that’s also good practice. I’ve drawn many private patterns, including complicated ones. Practice really does make the master!
We are also working on a new option that will allow you to upload an image or photograph and draw over it — perfect if you only have a printed pattern or want to use an image as inspiration, like tales for example!
3️⃣Before Saving: Important Things to Check
For your design to work correctly as a coloring page (whether drawn by you or imported):
PIECES PERFECTLY ALIGNED
When creating your own design and it's block based make sure to create one perfect block and then duplicate it.
When it's a non- block based design, make sure to align every new piece you add.
When you import a coloring page, you can use the "Align close segments" option
AVOID OVERLAPPING PIECES.
Overlapping pieces will cause coloring issues inside QuiltInk coloring pages.
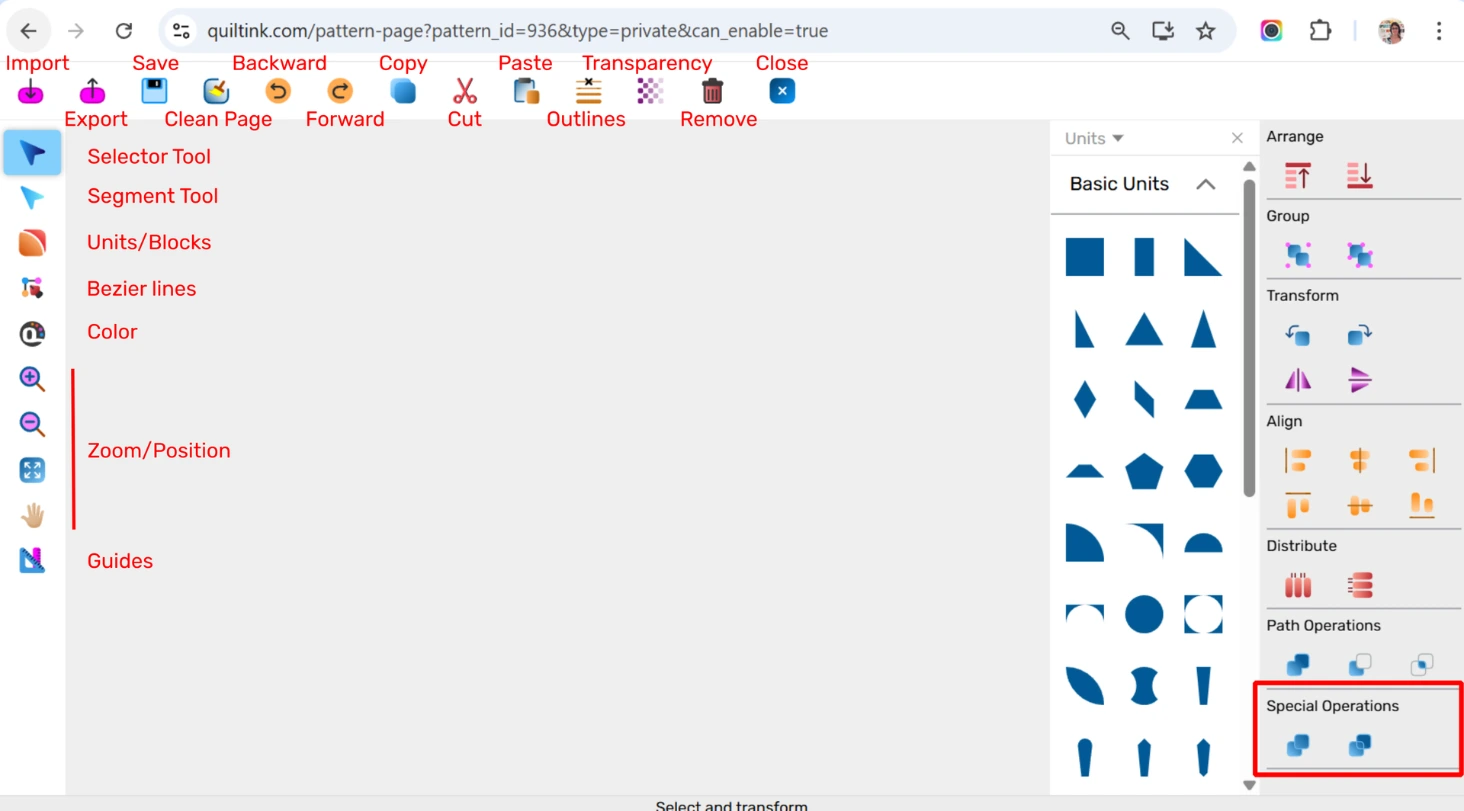
There is a dedicated tool to fix overlapping shapes. To use it:
- Select the overlapping pieces (or the entire design if needed)
- Click the icon: first icon inside the “Special Operations” section (check image above)
- The system will automatically resolve the overlaps
Always remember! A clean structure ensures a smooth coloring experience.
4️⃣ Save and Color
When your design is ready:
- Save your file. Adjust the real dimensions for a optimal printed fabrics scaling, and choose the standard size of your quilt.
- Close the Pattern Drawing Tool
- Go to the Mock-ups tab in the QuiltInk Pattern Page.
- Click “Create new mock-up”
- Select the layout to be the basis for your mock-up
Coloring from the Mock-ups tab ensures:
- All QuiltInk fabrics are available
- Your mock-ups are stored inside your Pattern Wall
- You can easily compare different color versions
Right now, you can apply color inside the Pattern Drawing Tool, but not all fabrics are available there. For the full experience, coloring through Mock-ups is recommended.
Full integration between drawing and coloring is in development.
--------------------------------
Watch this short video to see how easy it can be to draw with the tool — even with simple shapes!
To give you a quick idea of how the tool works, here’s a short video where I draw something simple using the Pattern Drawing Tool.
It’s not a quilt pattern — just a “47” I made for my birthday, purely for fun 😊
During the live session, I’ll be able to show you more in detail how everything works and answer your questions step by step.
What’s Coming Next
The Pattern Drawing Tool is now a beta tool. Over the coming weeks, you will see:
- More traditional block uploads
- Feature improvements
- Progress toward full editor–coloring integration
Let us know if you think of any special feature you miss in the program. Your feedback truly matters.
💬 Questions? Let’s Make a Live Session
f you have any questions while using the Pattern Drawing Tool, you can always reach out to me directly by email. I’ll be happy to help.
You’re also very welcome to join the live sessions that I’ll be organizing regularly every 1–2 months.
During these sessions, we’ll:
- explore the tool together
- go through common questions
- look at real examples
- and work step by step on anything that feels unclear
Submit Your Questions for the Live Session
I’ll announce each new live session by email in advance, so you can join whenever it fits you.
In the meantime, I encourage you to experiment with the tool, try things out, and let your questions come naturally. That’s the best way to learn.